Thursday, March 8, 2012

laura: DIY coat buttons

It's been cold lately. Very very cold. I've been living off hot coffees and disposable heat packs and wearing 10 layers of clothes. No one told me Hong Kong winters would be like this. HAHA. Ironic, coming from a Canadian, but hey, in Canada there's something called indoor heating, which is absolutely non-existent here. So alas, I am doomed to suffer the consequences of being too cheap to buy a small portable heater because I'm stubborn and keep telling myself that the cold spell will only last a few more days so "I'll tough it out til then", only to keep waking up to the morning chills. Anyway, I did buy a coat, which I guess is a cheaper/more fashionable option to a heater.
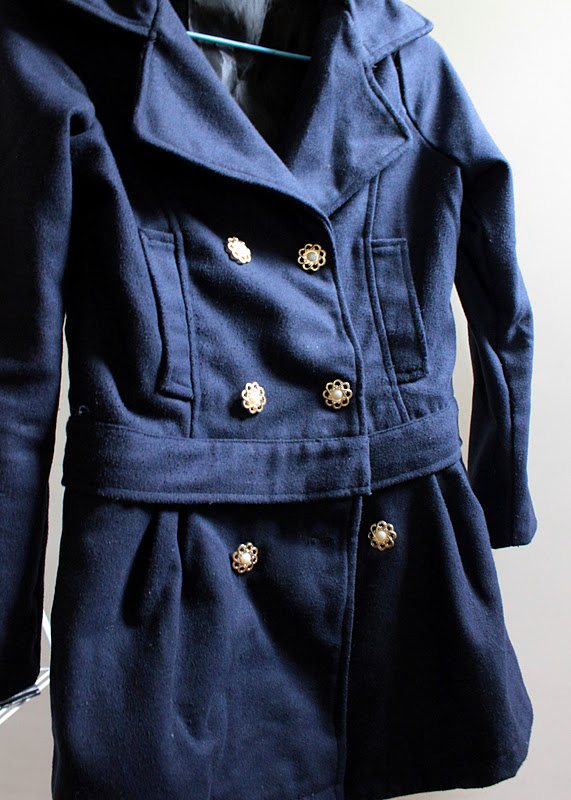
This coat was around $20CDN (um, Hong Kong shopping = ridiculously cheap). It even came with a detachable fur collar, and you can unzip the midsection to shorten the length of the coat. The only thing I didn't like were the silver buttons - they were made of a cheap plastic and were sewn on badly. But I knew that was an easy fix and in my mind I already had big plans for this coat... big plans... <>...

Moving right along then.

Silver has never really been my colour. I prefer gold or bronze jewelry because I find the warmer tones match better with my wardrobe. So I decided to rip off the silver buttons and replace them with gold ones.
I found these gold + pearl buttons in one of those alleyway markets where people set up stalls and sell random odds and ends. I love exploring quaint little markets over big commercial malls, any day.
Of course, all I needed for this was simply a needle, thread, and half an hour.
...I'm quite happy with the result. It's probably hard to tell from the pictures, but the new gold buttons make a really big difference and totally change the look of the coat.
Changing the buttons on a coat is so easy and it's simple DIYs like these that can improve the look of old pieces in your wardrobe.

=)


laura: floral wreath inspiration

I've always loved the whimsical look of floral wreaths. I'm going to eventually make one - (once I find a place to buy silk flowers in HK... any suggestions?) - but for now, here are some images of what I intend to create.

images above from k is for kani
The ones below aren't exactly wreaths, but those floral hair decorations could be easy DIYs by super-gluing a delicate silk flower or a vintage brooch onto a sturdy hair clip.
image from Belle Magazine
...and HERE is a great tutorial by Blooming Leopold on how to make your own wreath!
All you need is some floral wire, floral tape, and silk flowers! I also thought that you could use "bark wire" as well (google it) for a woody wreath.

Floral wreaths are perfect for field-frolicking! Can't wait till the weather gets warmer!
images from google =P

laura: dip-dye inspiration

I've been seeing a lot of dip-dye/ombre denim lately. I guess it's a toned-down revival of 70's hippie tye-dye. I've been wanting to dye a shirt or two for awhile now, but never seem to get around to it. So meanwhile, here's some dip-dye inspiration, courtesy of Google.

I love the thought of randomly dying a whole bunch of things...

...like tote bags, denim shorts, white t-shirts, and scarves!
I found a simple tutorial online (here) on the whole dip-dye process.
1: dip-dye levi's jacket - Denim Refinery // images 2-5: tumblr // 6: MDP // images 7-8: Blooming Leopold

Happy Dip-DIYing!


Monday, February 20, 2012

amanda: beautyfull addictions

I have a confession to make. I have a very addictive personality. This means if you introduce me to an online community, a fun computer game, or an enjoyable hobby, I am more than likely to be addicted.

For those classmates who see me everyday at school, they know that no matter how stressed I am with schoolwork, I still manage to keep my nails looking good. Yes, it sounds unbelievable, but it's the truth. I can be up at 3am sewing my final project but still manage to squeeze in a tiny break to do my nails so they look good for presentation day. HAHA. I'm addicted.


Do you like this new look? I found this idea on pinterest which is my other addiction :P
I bought this essie teal green polish last week called "school of hard rocks". It was love at first sight. I knew instantly it would look great with gold. I honestly am not a fan of the crackle/shatter effect usually. But I realized doing it this way makes it way more sophisticated.

So like I said, pinterest has become my newest beautyfull addiction. 
Those of you who don't know what pinterest is... here's a brief article about why it is the fastest growing site so far!

I am totally hooked because I'm a very visual person and when looking for photographs and inspiration pictures can be easier than filtering through google, then why not?! For those of you who are planning a wedding, a party, planning to cook up some new recipes, it's awesome!

Two amazing pics that make me smile (all found on pinterest):


If you want to join this magical online community, leave a comment with your email address and I'll invite you. Yup, pinterest is still by invite only! :)

Ohhh.. almost forgot. I did develop a new addiction recently. Well, I am asian and in New York so...
I've gone LINsane :P

Their second Knicks-Nets Game is in less than half an hour! I'm cheering my team on! :D

Now tell me what YOUR ADDICTIONS are! I hope they're just as beautyfull as mine!

Friday, February 17, 2012

amanda: valentine's day fun

I didn't get any comments about how your Valentine's Day went.. so here's mine:

First, I had to have some fun with my nails ;)
I just used a peach and nude base color alternatively on my nails. French tipped them with a very sparkly pink polish. Then drew in two tiny hearts on two fingers.


 Even though I didn't get to celebrate Valentine's this year, but at least looking down at my fingers made me smile!

I'm pretty sure you guys had a better valentine's compared to mine cause I worked at school until 9:30pm and only had a starbucks green tea and a banana for dinner that night. :(


I was working on draping this cowl top at school... 

It got pretty frustrating because the fabric was so slippery and I was so tired from a whole day of classes. But here's the finished project.. not the best work I've done, but I know what went wrong and will try to improve next time!


Here's my dolled up fingers journaling on Feb. 15th~ 
I was reflecting upon the fact that I'm not a big fan of this occasion but found it awfully hard not to be affected when everywhere I went, there were flowers, chocolates, teddy bears, and a lot of happy couples. 


 But like I said on twitter: 
"Valentine's day is great for those who usually have no time to love. But for those who love everyday, it's just like any other day."

I know I'm loved. What about you?
Now it's YOUR turn to tell me about your Valentine's!!
GO!

Friday, February 10, 2012

amanda: beautyfull valentine's day

February sure seems like a very eventful month here in New York. Fashion Week just began and Valentine's Day is just around the corner.


Interestingly enough, laura and I are both going to be away from our special someones and on our own for Feb. 14~ But that shouldn't stop us (or you) from dressing up for the occasion!
So I thought I'd share a few beautyfull things that help set the mood for Valentine's Day. Enjoy :)


I love this makeup look by Michelle Phan - even though it was from 3 years ago! If you don't usually wear pink eyeshadows, give it a try this valentine's~


Those of you who know me, I love nail art - but unfortunately pretty lazy to do really complicated designs. There are tons of Valentine's-themed nail art tutorials. I think I like this one cause it's cute but kinda creepy at the same time.. haha.


Well, have a BEAUTYFULL Valentine's Day!
Leave a comment if you tried anything posted and tell us about how you are spending Valentine's :)

Wednesday, February 1, 2012

amanda: intro to jewellery design

I apologize for the late post! But here's my take on designing rings.:)
After years of shopping for rings and imagining what rings I'd love to have, I decided to finally take an actual jewellery design course at my school.


 To start the design process, it is necessary to sketch out your ideas from various views so that when you are to make it, you will be clear about all angles of the design.
Then you make a wax mold of the design by sawing and filing a clump of casting wax. When you like what you have, you bring it to get it casted into your choice of silver, yellow brass, white brass, etc.

After you pick up the casted ring, you can see that there's a piece of brass sticking out. This needs to be sawed off carefully.
Then you must polish the ring with these sanding wheels to get all the debris off and see the brass shine through. :)
These tools are found only in a jewellery design studio so I can only work on my jewellery at the school's studio.

After hours and hours of hard work.. here's the finished product!
I personally like simple but edgy ring designs. This simple geometric ring is my very first attempt at jewellery design. I also casted it in white brass! How much would you be willing to pay for a brass ring like this one? 

Btw, this is my professor's website: http://www.geoffreygood.com/
Check out his stuff - it's pretty awesome!